

Welcome to Gathering Branches! For those of you that are new around here, I'm Marian and this is the story of how I build my annual barn show, Branches. It is also the story of my art and my many arty adventures, as well as anything else that comes up. For those of you who are not new here, thank you so much for always coming back. You are true friends.
So, you all are here to celebrate a Wonderful Week of Christmas, yes? Well hooray, because today I'm going to tell you guys how I made this awesome pallet wood Christmas sign. And if you are not feeling very Christmassy, because you are reading this in, say, August or October, well then just think of it as an unusually festive tutorial about how to make a NOT Christmassy pallet wood sign and just change what you write on the sign. Then everyone is happy, regardless of the season.
But I digress...On to the project!
Materials:
the wood from 1 pallet
1 pine 1in x 2in x 8ft board, depending on size of sign
1 2x4 ft or smaller sheet of lauan backer board or 1/4 in plywood, cut to the size of your sign
Loctite wood glue in a caulk style tube
Paint in desired colors
paint brushes, various sizes
100 and 220 grit sandpaper
A palm sander and miter saw are helpful
caulk gun
electric drill
screwdriver
pair of D ring hangers
enough screws for 2 D ring hangers

Step 2. Break down your pallet Once you have your pallet, you need to break it down so you are just working with strips of wood. I wrote a whole post about that here, so if you've never done this before, check it out. We'll wait for you. OK, everybody caught up? Pallets all in pieces? Arms, legs, fingers, etc all still attached? Good. Then we can go on.
Step 3. Design your project. This usually involves an inspiration
idea/image and a rough sketch. My inspiration idea came the day I
decided to do this blog walk. I hate decorating for Christmas before
Thanksgiving and had a bit of a mental block about where to go with it. So I asked
my dear friend Dana what I should do. She suggested a Christmas sign.
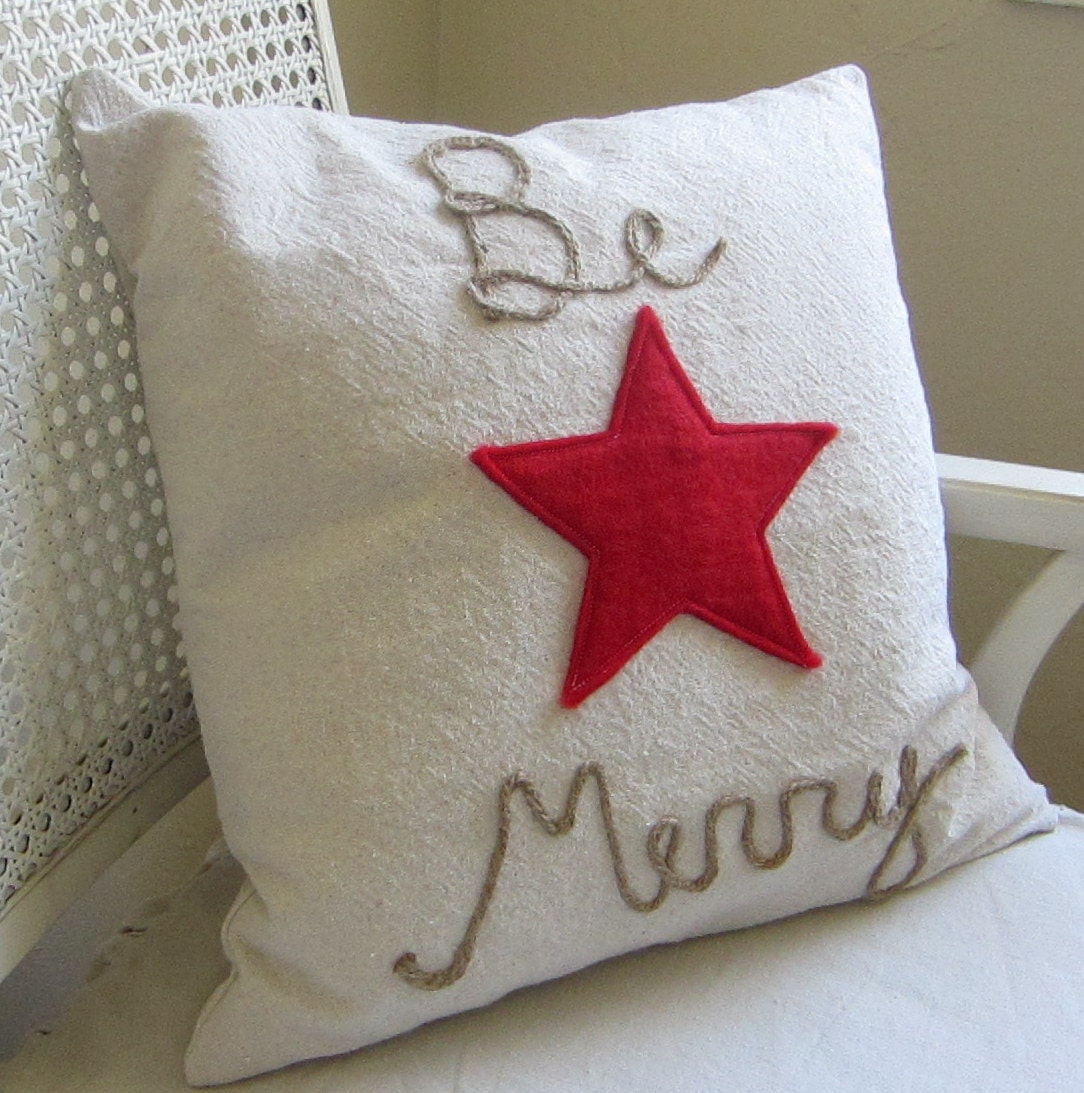
And that was that. My idea for the wording came from a pillow. You never
know when inspiration will strike, right?
I was actually stalking gazing dreamily at my friend Anna Addcox's wonderful Etsy shop, A Good Home, when I saw this darling pillow. (Just click on the image if you need to have this great pillow right now. It will magically transport you right to the Etsy listing.

Making a sketch of where you are going is also really useful. It will help you with proportion and color balance. You don't need anything fancy or to scale. Just a pencil, paper and some crayons will do the job nicely.
You will need to decide how big to make your sign in this stage. I knew I needed to us the wood I had to build three signs, so that set my lengths. Two 18in wide signs and one 15 in sign that were 5 boards tall. It can be whatever size you want, you just have to know what size before you start cutting.


It's time for power tools, baby! You can use any number of ways to cut your pallet wood, but I prefer a compound miter saw. If you are careful, a circular saw, hand saw, or table saw would also work.
Make straight, vertical cuts with your saw. And don't forget your safety glasses.
Cutting and measuring can take a while, like over an hour if you're not a regular saw user, so plan for that.

Framing 1 x 2's:

Here you can see the blunt corner on the bottom of the board. Be sure BEFORE YOU CUT, to make sure you have enough wood to account for the larger top edge of the miter. You want to measure the inside and the outside, so you don't cut and have a nicked edge because you ran out of wood. I have done this before. It's very unfun.
And don't forget that your cuts have to be opposite, with the miters both heading towards the center.

This is the support piece we will glue the pallet wood to. If you buy this at Home Depot or Lowes, you can usually talk them into cutting it for you. I usually go during uncrowded times and show a little cleavage. It's in the section that sells smaller sheets of flat wood.
This needs to be the same size as all your pallet wood boards together or slightly smaller. You will be attaching the frame on the outside of this, so too small is better than too big.
If you have to cut it yourself (HD said I needed too many cuts so they'd only do half for me. Lower cut shirt next time.), use a table saw, if you have access to one. Once again, wear eye protection.


Don't be afraid to do two coats, if you want it really white. If you're feeling lazy, one coat will do.

Be sure to paint the sides of the boards, but not the backs. There will be small gaps between each board.This adds to the charm of the piece, but allows the inside edges to be seen, and it will look weird if the sides are natural wood when the board faces are painted.

This may be a no-brainer, but let your paint dry completely before you add anything on top of it. if you're in a hurry, you can use a blow dryer. Just be sure not to let the paint get too hot, or it may crackle. It takes about an hour, give or take for ASCP to dry fully.
I went with a very light blue mix of ASCP Louis Blue and Old White. it looks grey in the picture, but Louis Blue is a soft sky blue.Keep in mind that you will be sanding through the top coat, to expose the base coat. So when you choose your colors, be sure to go with two that will look go together.

Here you can see that the paint is light blue.
I chose to fill the holes and gaps with paint. If you like the look of seeing the holes black, or more natural, then put on less paint. If you want them filled in like mine, you'll need to use more paint and a little more focused effort in those spots.

Step 10. Sand off the top coat to reveal your base coat. I use 220 to gently hand sand off the top coat to reveal the texture of the wood and the color of the base coat. You can go all the way to the wood if you want a more rustic look. I decided to stop once I hit white.
You can see the difference between the sanded board in the front and the unsanded ones behind it.
NOTE: Normally, this is when you would wax during the chalk painting process. DO NOT WAX HERE. I did not wax my sign at all because I preferred the chalkiness, but if you wanted that smooth look, or the protection wax affords, I would recommend waiting until after you have done all your lettering.

Lay then out on the previously cut backer board and make sure everything lines up as it should.
Then you pull out your trusty caulk gun and your tube of Loctite Wood construction adhesive. I was so excited when I saw they made a wood version of Loctite. I LOVE construction adhesive. You can freaking glue anything together with this stuff. It's amazing. I've actually thought about gluing my kids to their bedroom doors before. And no, I did not actually try it, although I may have been sorely tempted.

.JPG)
Repeat this process for each board. And be sure to loosen the lock on the caulk gun each time you put it down so the glue doesn't keep oozing out when you aren't watching.

Push down all over each board to be sure every thing's all nice and adhered. Then put a bunch of heavy stuff on it. The tube says to walk away from it for 24 hours. I didn't have that kind of time, so I waited overnight. It seemed to work just fine. The next afternoon I could hold the sign upside down by the backer board and shake it and nothing moved. Once the glue's nice and dry, you can finally get to making the sign part of the sign.

There are a number of ways you can proceed from here. I found freehand lettering just using my pencil guideline was much more difficult than I had anticipated. I would not recommend this method for anyone just starting out hand lettering. You could use stencils or vinyl letter decals or adhere chip board letters and still get a very attractive result.

I wanted white script letters with a black outline and so I decided to paint a larger black outline first, and then paint the white inside the black with a smaller brush. This was a great theory and it worked in practice, but it made me sweat a lot and left me very little margin for error.
I practiced on a hand piece of cardboard to make sure I was using the right size brush and to figure out how wide the letters needed to be. I highly recommend this step.

This is the brush I chose to go with. it has a gently rounded edge that gave me a line similar to a calligraphy pen. it was about 1/4 in wide. if you're not sure which brush to use, try a bunch of different ones on your piece of cardboard and see which comes the closest to writing the way you had envisioned.
NOTE: Be sure to paint starting on the far left, or in a location that your hand won't pass over the letters once they are painted.

Anyone have a guess as to where the spots were? Hint, it is not near the tail of the "y".


It took two coats of Pure White and drying time between them to get the look I wanted.
I also added another coat of Emperor's Silk ASCP to the star. I think I forgot to tell you the color before.
If you don't have the right color of chalk paint for the letters, you could just use craft acrylic paint instead. You'll just have to make sure it doesn't get too thick on the brush.

And if you've made it this far, you are almost done! Take a deep breath. All we have to do is wax or paint the frame, attach it, and add the hangers. Way easier. Trust me.

If you are waxing, I applied thin spots of wax right to the wood randomly and then rubbed them with a paper towel and my fingers until I liked the texture and finish. My hands were very silver by the end of this process.
If you are painting, try rubbing the paint on with a paper towel. Just see what works.


I really did have a great plan for this. Unfortunately things don't always go as planned. My great idea was to glue the frame on with the wood construction adhesive. This didn't work out well. I ended up covered in adhesive and the frame wouldn't stay together well enough to dry properly. I ended up doing a hybrid approach of gluing the mitered ends and then nailing the frame. Taping the ends once they're glued might help keep them in place.

I let it sit overnight before proceeding so the glue had a chance to dry.

Do this evenly for both sides.


Be careful not to drill through the top of the sign. When in doubt, stop and check.


I used needle nose pliers to wrap, tighten and cut the wire.

Guess what? You're done!
You made a pallet wood sign. Way to go!
After all that, you must be feeling a bit tired. I know I am. So if you want, you can just enter to win the sign.
Great tutorial Marian! Love this
ReplyDeleteWendy xx
I love this sign! I cannot believe you free-hand it though!?? My hand is not that steady, thank goodness for my Silhouette :) I've entered the giveaway and pinned this!
ReplyDeleteMarian,
ReplyDeleteYou are a creative master! I love the sign and tutorial! You go girl!!!
I really love that sign!! And your tutorial is smart, thorough and engaging, as always :). You rock, girl!
ReplyDelete